
Growing food in the winter inside a low tunnel
When winter arrives and the ground becomes frosty, many gardeners assume that growing fresh produce is out of the question until spring. However, with the help of low tunnels, it is possible to continue growing food throughout the cold season. Low tunnels, also known as hoop houses or mini greenhouses, provide a protected environment that shields plants from harsh winter conditions while allowing sunlight to reach them. In this article, we will explore the benefits of using low tunnels for winter growing, discuss the selection of suitable crops for this purpose, and provide guidance on soil preparation, temperature management, irrigation techniques, pest control, and strategies for extending the winter growing season. By embracing the possibilities of low tunnels, you can enjoy a bountiful harvest even when the temperatures are cold outside!
What is a low tunnel?
Winter can be a challenging time for gardeners, but with the help of low tunnels, you can extend your growing season and enjoy fresh produce even in the coldest months.
So, what exactly is a low tunnel? Think of it as a mini greenhouse made of hoops or arches covered with a protective material like polyethylene. It creates a cozy microclimate for your plants, shielding them from harsh winds and frost while trapping heat to keep them toasty warm.
Benefits of Using Low Tunnels for Winter Growing
Low tunnels offer a host of advantages when it comes to winter growing. Besides prolonging the harvest season, they also provide a safeguard against unpredictable weather conditions. Your leafy greens won't succumb to the frigid temperatures, and your herbs won't wither away. Plus, low tunnels are relatively inexpensive and easy to set up, making them accessible for gardeners of all skill levels. So, when you're not ready to bid goodbye to your garden, low tunnels can be extremely helpful.
Choosing the Right Low Tunnel Design
When it comes to low tunnels, you have plenty of design options to choose from. Whether you opt for a simple hoop structure or a more elaborate mini greenhouse, consider factors such as the size of your garden and the crops you intend to grow. Additionally, make sure to select materials that are sturdy enough to withstand winter conditions without adding unnecessary weight. After all, you want your low tunnel to protect your plants, not become a winter wonderland for freezing rain or snow drifts!
Selecting the Right Crops for Winter Production
Cold-Tolerant Vegetable Varieties
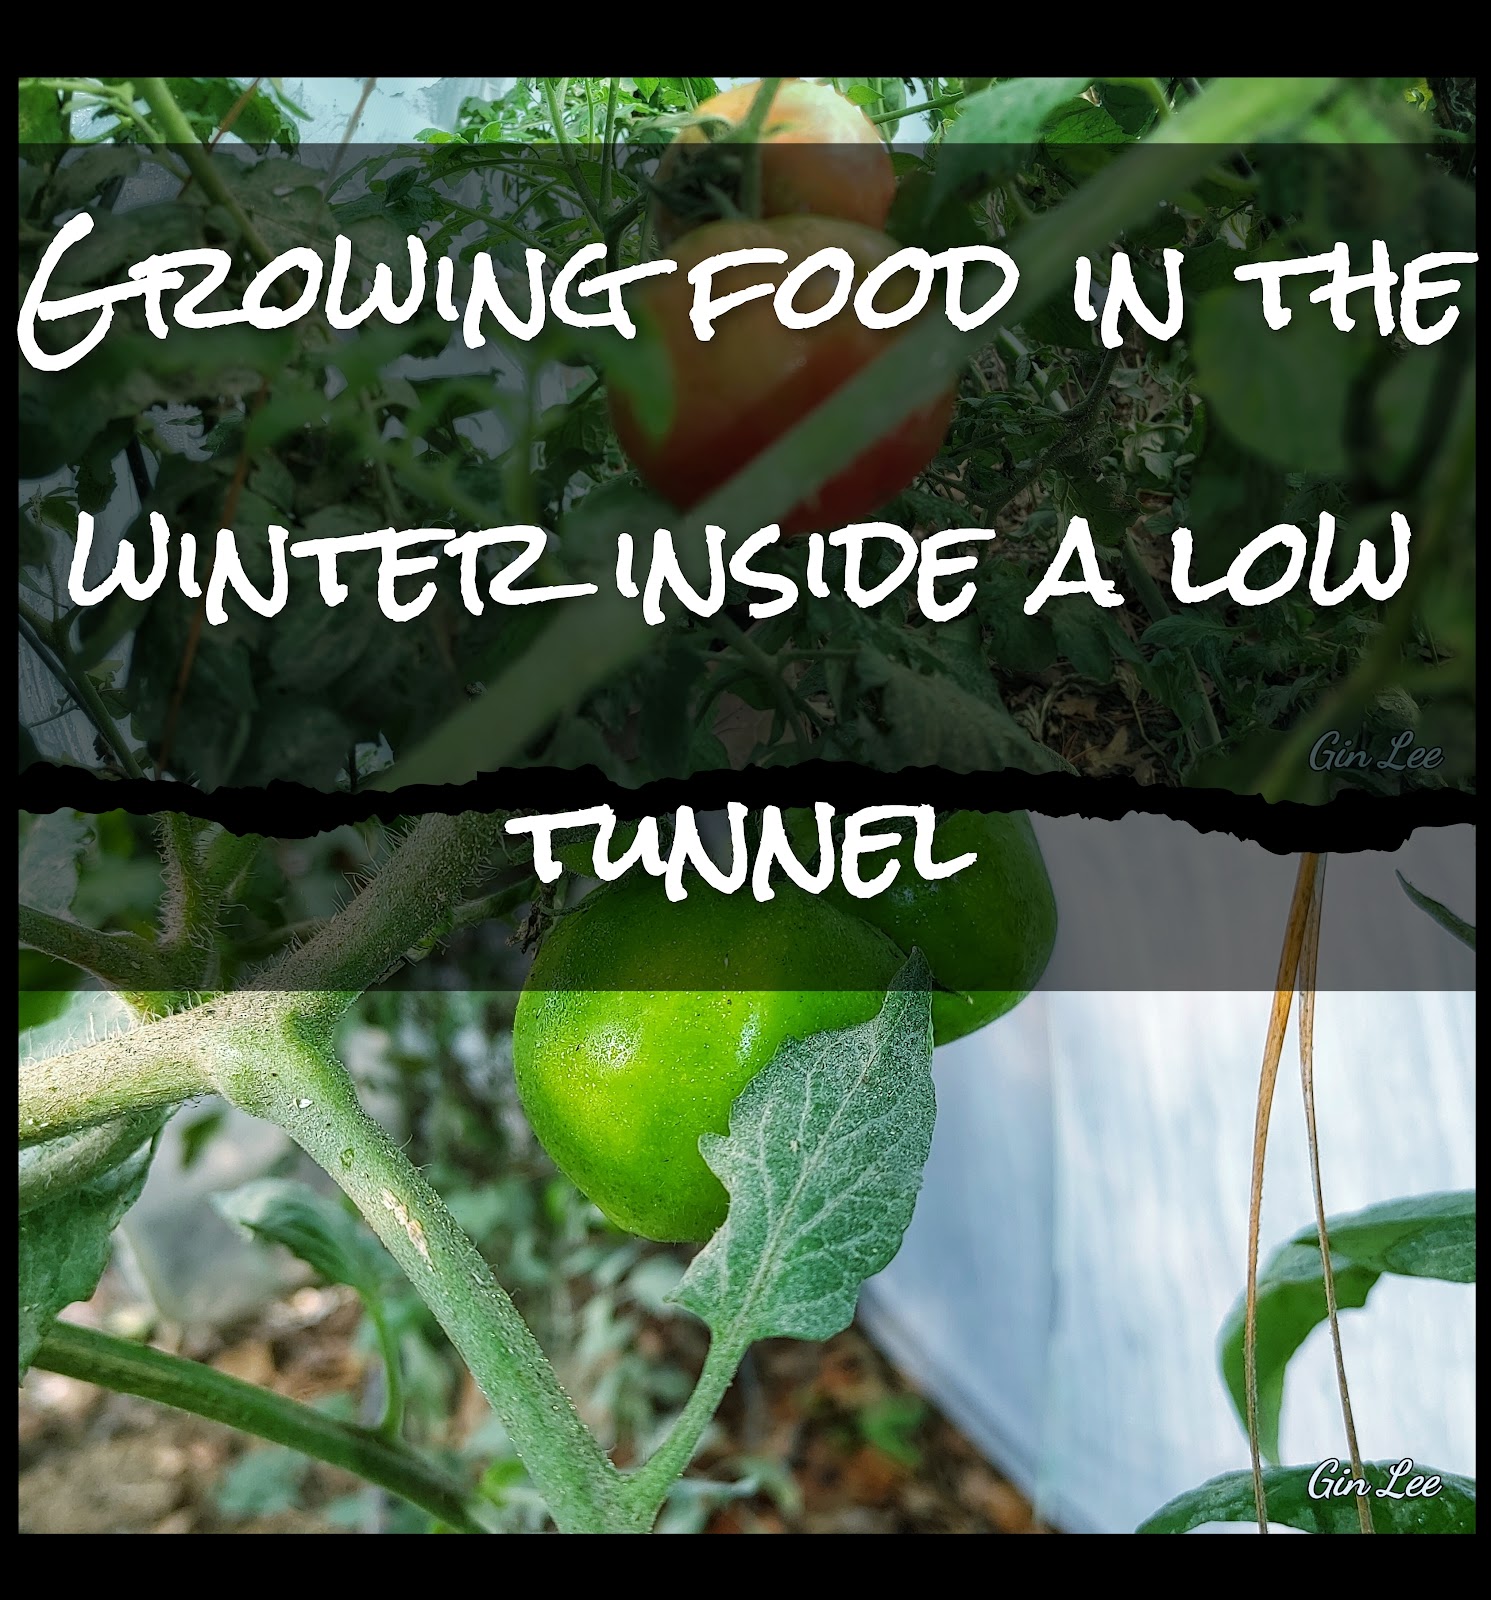
Even though it's January, I am still growing tomato and okra plants in my low tunnels, and I just picked several tomatoes yesterday. This is the first winter that I have ever tried to continue to grow these heat-loving vegetables outside. They're all plants that I planted from seed last spring. The plants were simply too gorgeous to pull up once winter arrived. So far, the plants are doing well inside my low tunnels due to the milder than normal temperatures that we are having in our state.
However, keep in mind that not all plants are cut out for winter growing, but luckily, there are plenty of cold-tolerant vegetable varieties that thrive in low tunnels. Leafy greens like kale, spinach, and Swiss chard, along with hardy root vegetables like carrots and radishes, are excellent choices. Don't forget about herbs too! Many herbs, such as parsley, rosemary, and thyme, can withstand the chill and continue to add flavor to your dishes throughout the season.
Succession Planting for Continuous Harvest
To make the most of your low tunnel, consider succession planting. This way, you'll have a continuous supply of fresh produce throughout the winter. As one batch nears harvest, another will be ready to take its place, ensuring that your low tunnel remains productive and your plate is full of seasonal delights.
Planning for crop rotation
Crop rotation is equally important in low tunnels as it is in traditional gardens. By rotating the locations of your crops each year, you minimize the risk of soilborne diseases and nutrient depletion. Plan your planting layout accordingly, ensuring that you alternate between crops within the same family. This practice will contribute to healthier plants, better yields, and a thriving winter garden.
Preparing the soil and planting in a low tunnel
Before planting in your low tunnel, it's essential to prepare the soil adequately. Start by removing any debris or weeds, and then amend the soil with organic matter to improve its structure and fertility. Adding compost or well-rotted manure will supply your plants with the nutrients they need to thrive.
Creating raised beds for improved drainage
Raised beds are a game-changer in low-tunnel gardening. Not only do they help with drainage, preventing waterlogged soil, but they also make it easier to control weeds and manage the overall health of your plants. Use boards or other materials to create raised beds within your low tunnel, ensuring they are wide enough for proper plant spacing and easy access for maintenance.
Planting Strategies for Efficient Space Utilization
Space is precious in a low tunnel, so make the most of it by utilizing efficient planting strategies. Consider interplanting compatible crops, such as lettuce and radishes, to maximize yield. Additionally, vertical gardening techniques, like trellising peas or beans, can help you fill every nook and cranny of your low tunnel with green goodness. Remember, the more you can grow in a limited space, the more bountiful your winter harvest will be!
Managing Temperature and Light in the Low Tunnel
Keeping your plants cozy during the winter is crucial, and proper insulation is the key. Mulch the soil to insulate plant roots, and consider using row covers or blankets to create an extra barrier against the cold. Additionally, employing thermal mass materials like water-filled containers can help regulate and retain heat inside the low tunnel. With a little ingenuity, you can transform your low tunnel into a snug haven for your crops.
Ventilation Techniques for Temperature Control
Maintaining the right temperature is a delicate balance in low tunnels. Too much heat can harm your plants, while excess humidity can invite diseases. To combat these issues, ensure proper ventilation within your low tunnel. You can achieve this by opening the ends or sides of the structure during the day to allow air circulation. On the flip side, remember to close it up at night to preserve warmth and protect against frost.
Maximizing natural light exposure
While low tunnels offer protection from the cold, it's important to maximize natural light exposure for your plants' growth and development. Keep an eye on the positioning of your low tunnel to capture as much sunlight as possible. Regularly clean the covering material to prevent dirt, leaves, or snow from blocking the precious rays. If needed, consider using supplemental grow lights to compensate for any light deficiencies during the shorter winter days.
Proper Watering Schedule in the Cold Season
In the chilly winter months, watering your plants may not be at the top of your to-do list. After all, everything seems pretty dormant and dry, right? Well, think again! Even in the low tunnel, your plants still need a drink to thrive.
So how do you navigate the delicate balance of keeping your plants hydrated without freezing their roots off? The key is to establish a proper watering schedule. Unlike the warmer seasons, when plants typically need watering everyday or every other day, winter plants require less frequent watering. Aim for watering once every week or two, depending on the weather conditions.
Of course, it's essential to consider the specific needs of each plant variety and adjust accordingly. Monitor the moisture levels of the soil by sticking your finger about an inch deep into the ground. If it feels dry, it's time to water it. But if it's still moist, hold off for a few more days.
Efficient Irrigation Systems for Low Tunnels
When it comes to irrigating your winter garden in a low tunnel, you'll want to make sure you're doing it efficiently. Drip irrigation is an excellent option for providing water directly to the plants' root zones. This method not only conserves water but also minimizes the risk of disease since it avoids wetting the foliage.
Another efficient approach is using self-watering containers. These containers have a built-in reservoir that gradually feeds water to the plants, reducing the need for frequent watering.
Remember, the key is to avoid overwatering, as excess moisture can lead to root rot and other issues. So, resist the temptation to drown your plants with love and stick to a mindful irrigation strategy.
Rainwater Harvesting and Storage
If you're looking to take water conservation to the next level, consider rainwater harvesting. Install rain barrels or a rainwater collection system near your low tunnel to capture the precious liquid from the sky.
Not only will this help reduce your water bill, but rainwater is also often better for your plants, as it lacks the added chemicals found in tap water. Plus, there's something satisfying about knowing you're putting nature's gift to good use.
Now, onto the next challenge: keeping those pesky pests and diseases at bay.
Common Pests and Diseases in Winter Growing
Just because it's winter doesn't mean the critters and diseases have packed up and flown south for the season. Nope, they're still around, ready to wreak havoc on your precious plants. Some common winter pests include aphids, slugs, and snails, while diseases like powdery mildew can also make an appearance.
But fear not! With a proactive approach, you can keep these unwanted guests from turning your low tunnel into their winter resort.
Organic pest control methods
When it comes to dealing with pests in a low tunnel, it's best to stick to organic pest control methods. Chemical pesticides can harm beneficial insects and disrupt the delicate ecosystem you're trying to foster.
Instead, opt for natural solutions like introducing beneficial insects, such as ladybugs, to feast on aphids. You can also create physical barriers using netting or floating row covers to keep pests out.
And if you're feeling a bit adventurous, try making your own homemade pest sprays using ingredients like neem oil or soap solutions. Your plants will thank you, and you'll have a newfound respect for your kitchen pantry.
Disease Prevention and Management
Preventing diseases in a low tunnel starts with proper sanitation. Clean up any fallen plant debris promptly, as it can harbor disease-causing pathogens. Additionally, ensure good airflow by spacing out your plants, as stagnant air can encourage fungal growth.
Crop rotation is another valuable technique to reduce the buildup of diseases in the soil. By rotating the types of crops you grow in your low tunnel each season, you disrupt the life cycles of pathogens and minimize their impact.
Harvesting and Extending the Winter Growing Season
Ah, the sweet satisfaction of harvesting your winter bounty. But how do you know when it's the right time to pluck those leafy greens or crunchy carrots from their cozy low tunnel beds?
Keep an eye on maturity dates specific to each plant variety as a general guideline. However, don't rely solely on the calendar; observe the plants themselves. Are the leaves vibrant and full? Do the roots appear plump and ready? Trust your instincts, and gently sample a leaf or two. If the flavor and texture meet your expectations, it's time to start harvesting!
Extending the Growing Season with Row Covers
If you're not ready to bid farewell to your winter garden just yet, row covers are your secret weapon. These handy fabric covers can provide an extra layer of protection against frost and cold temperatures, allowing you to extend the growing season.
When frost is forecasted, cover your plants with row covers in the evening and remove them during the day to allow sunlight in. This simple technique can buy you a few more weeks or even months of fresh produce from your low tunnel.
Storing and Preserving the Winter Harvest
Now that you've successfully harvested your winter goodies, it's time to think about storing and preserving them for future enjoyment. Many winter crops, such as root vegetables and hardy greens, can be stored in a cool, dark place for several weeks. Just make sure to remove any damaged or diseased parts to prevent spoilage.
If you're feeling particularly ambitious, consider pickling or canning your harvest. This way, you can relish in the flavors of your winter garden long after the snow has melted away.
Key Tips for Successful Winter Growing in Low Tunnels
Congratulations! You've made it through the winter growing season in your low tunnel! As you bask in your green-thumbed glory, here are a few final tips to ensure your future winter gardening endeavors are just as successful:
Monitor soil moisture regularly and adjust your watering schedule accordingly.
Choose efficient irrigation systems like drip irrigation or self-watering containers.
Consider rainwater harvesting to reduce water consumption and tap into nature's gift.
Implement organic pest control methods to protect your plants without harming the environment.
Practice good sanitation and crop rotation to prevent diseases in the low tunnel.
Know the signs of readiness for harvesting and savor the fruits of your labor.
Utilize row covers to extend the growing season and get more out of your low tunnel.
Store or preserve your winter harvest to enjoy the flavors of the season year-round.
In conclusion, growing food in the winter using low tunnels opens up a world of possibilities for year-round harvests. By selecting cold-tolerant crops, preparing the soil properly, managing temperature and light, and implementing effective watering and pest control techniques, you can create a thriving winter garden.
With these tips and a touch of winter gardening magic, you'll be amazed at what you can achieve in your low tunnel. So, roll up your sleeves, put on your gardening gloves, and embark on a winter growing adventure that will warm both your heart and your stomach!
Notes:
It is important to choose a low tunnel design specifically intended for winter growing. Look for structures that provide insulation and heat retention, as well as proper ventilation options to control temperature. This will ensure that your plants are protected from the cold while still receiving adequate airflow.
In past years, Arkansas zones ranged from 6b to 8a. However, with the recent update, each zone in the state of Arkansas has shifted up, with zones now ranging from 7a to 8b.
Comments
Post a Comment